This chapter contains the following topics:
Printing the Source Cross Reference Report
The Source Cross Reference selection enables you to print the Source Cross Reference Report, which is a list of entries within the range of dates you specify, grouped by either their source code or journal number.
You manually enter a source code when you enter either standard or general journal entries.
A source code is assigned automatically when you run Get Distributions to transfer entries from other Passport modules into General Journal Transactions. For example, the source code for Accounts Payable entries is always AP (unless you manually change the general journal before posting the entries).
The following source codes are automatically assigned to designate the source of an entry:
|
Code |
Journal |
Code |
Journal |
|
ML |
General journal |
AR |
A/R invoices |
|
GJ |
Distributions |
PM |
Manual payroll |
|
SJ |
Standard journal |
AV |
A/P voided checks |
|
MC |
A/R misc chgs |
PO |
Purchase price |
|
CJ |
A/R cash receipts & returned checks |
PR |
Payroll checks |
|
FC |
Finance charges |
IC |
Inventory entries |
|
AP |
A/P vouchers |
JC |
Job cost entries |
|
AJ |
A/P adjustments |
JB |
Job billing entries |
|
AK |
A/P checks |
TB |
Time sheet entries |
Journal number refers to the report printed when you post general or standard journal entries within the G/L module, or when you post other types of entries in other PBS modules. Each journal number has a two-letter source code (GJ for distributions, SJ for standard journal, etc.), followed by a unique report number. For example, SJ0005 is a report number.
Thus, you can always associate a journal number with a specific printed report, and (provided you have not run Summarize General Ledger) you can reconstruct a lost report by using this program.
To reconstruct a report:
| • | Specify to print in journal number order. |
| • | Specify all sources. |
| • | Specify the particular journal number as both the starting and ending journal number. |
| • | Specify all dates. |
See a Source Cross Reference Report example in the Sample reports appendix.
Select
Source cross reference from the Reports menu.
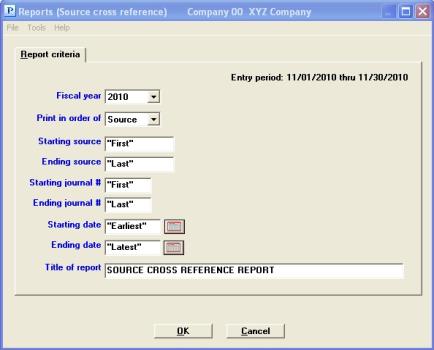
Graphical Mode
The following screen appears:

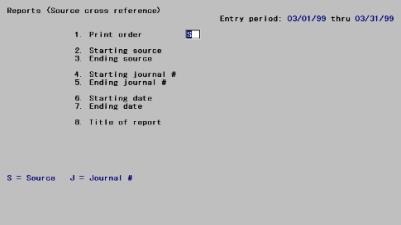
Character Mode
The following screen appears:

Enter the year that you want to report, or use the option:
|
<F1> |
For the next year |
|
<SF1> |
For the previous year |
The default is the most recent fiscal year in accounting periods.
|
Format |
Drop down list |
|
Example |
Select 2011 |
Choose Source (enter S) or Journal # (enter J).
|
Format |
Graphical: Drop down list. The default is Source Character: One letter, either S or J. The default is S |
|
Example |
Press <Enter> to print in source order |
Starting source and Ending source
Options
Enter the range of sources to print, or use the option:
|
<F2> |
For First or Last source |
|
Format |
Ten characters at each field |
|
Example |
Press <F2> for each field to print a range of First to Last. |
|
Note |
Even if you have selected to print in journal number order, your source selection still affects which entries will be printed (i.e., only entries from selected sources will be printed). |
Starting journal # and Ending journal #
Options
Select the range of journal numbers to print. You may select journal codes from the pop-up window, or use the option:
|
<F2> |
For First or Last journal number |
|
Format |
Nine characters at each field |
|
Example |
Press <F2> for each field for a range of journal numbers from First to Last |
If you do enter a journal number, it need not be an actual journal number. For example, entering GJ0000000 for Starting journal # and GJ9999999 for Ending journal # will print all entries from distributions posting.
|
Note |
Starting with PBS version 12.03, the journal number was expanded from 6 to 9 characters to allow larger numbers when printing to disk. For PBS 12.02 and earlier the 6 character numbers are retained after the upgrade to match the original posting reports. Due to sorting constraints, for the Starting and Ending journal # fields, you will not be able to enter a starting journal number of 6 characters and an ending journal number of 9 characters. |
Options
Enter the range of dates you wish to print (any date, not necessarily a date in your accounting period table), or use the option:
|
<F2> |
For Earliest or Latest date |
|
Format |
MMDDYY at each field. The default is the starting date and ending date (respectively) of the current accounting period. |
|
Example |
Press <F2> for each field for a range of dates from Earliest to Latest. |
In summary, when you have selected starting and ending sources, starting and ending journal numbers, and starting and ending dates, any entries which are within all of these three limits are included.
Options
Enter any title you want, or use the option:
|
<F2> |
For the title Source cross reference report |
For readability, spaces are inserted in the title automatically. For example, MY UNIQUE REPORT becomes M Y1 U N I Q U E2 R E P O R T.
|
Format |
50 characters |
|
Example |
Press <F2> |
Make any needed changes. Press <Enter> to print the report.
If there are no entries within all three sets of limits (sources, journal numbers, and dates), you will see No entries in range selected.
If this report is in source order, the report lists all entries within the journal number and date limits in order by source. The report shows subtotals for each source and grand totals for all sources.
If the report is in journal number order, the report lists all entries within the source and date limits in order by journal number. The report shows grand totals for all journal numbers.
If there is limited disk storage, it is possible, but unlikely with modern hard drive sizes, that there may not be enough room to process a report for all entries. If this is the case, you will see a message and cannot continue the function.
To handle this, you can either:
| • | Narrow your source, journal number, or date limits, so that fewer entries print (and then print the rest separately afterward); or |
| • | Compress the General Ledger Transactions (refer to the Summarize General Ledger chapter), and then run the report for all entries that you initially specified. |